All posts by Epix

打砖块 回忆
最近听说最古老的打砖块游戏新版(Breakout: Recharged)上市, 想了想我也是非常喜欢玩打砖块的, 从小到大也玩过好几个. 正好在这里回忆一下.
Continue reading 打砖块 回忆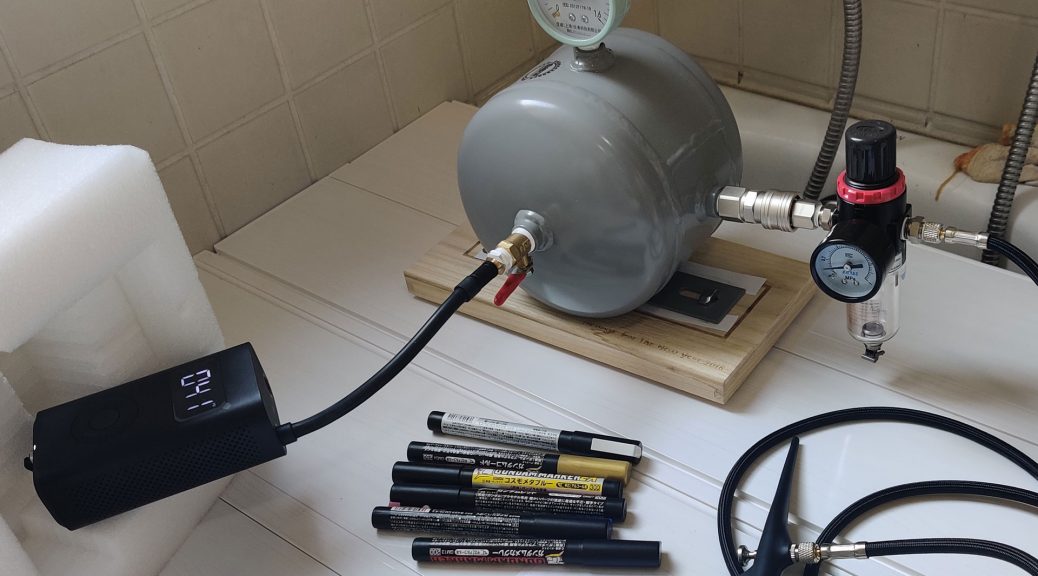
简易高达模型补色喷涂系统
警告: 本文中介绍的设备和使用方法有造成严重人身伤害的风险, 请勿模仿.
本文仅供测试娱乐之用, 本文的目的/达到的效果可能不包括: 让模型更好看, 更加省钱, 更方便喷涂操作. 本文中提到的物品和行为都是偶然选择, 不代表推荐建议.
Abstract
本文主要介绍了一套简易的高达模型喷漆系统, 适用于高达模型简易补色. 介绍了设备工具选择及搭建过程, 并给出了使用系统所实现的喷涂效果.
Continue reading 简易高达模型补色喷涂系统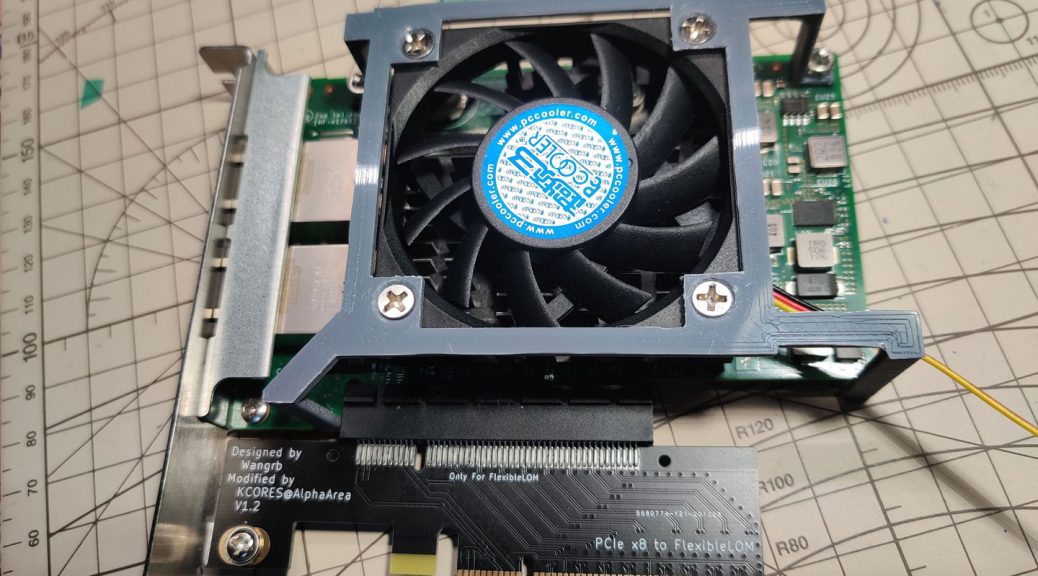
561FLR-T cooling fan mount/散热风扇支架
前段(半年前)时间被种草买了两块 HPE 561FLR-T 电口万兆网卡, 用于连接NAS和主力机.
ref: https://post.smzdm.com/p/av7om33p/
入手之前就有了解会很热, 不过参考某视频, 加装一个6010风扇就行了.
ref: https://www.bilibili.com/video/BV1AA411M7UL?t=3m4s
于是购买了视频同款的超频三旋风F62风扇. 然而尝试和视频中一样使用扎带固定后没过多久, 风扇工作状态似乎就不太稳定. 于是决定单独弄个架子.
大概拿尺子量量画一下然后3D打印出来.
安装需要拆掉原来的金属条, 原来的螺丝可拆可不拆. 这里我只把塑料部分拆了.

平板电脑漫画翻页器(飞梭)
2021-07-19 由于这玩意还挺好用的(天天用), 停止迭代很久了. 这两天平板电脑处于坏掉的边缘(换掉鼓包电池后问题修复), 再不发怕是拍 demo 又要等很久了.
Demo 视频
也可查看 YouTube 上的 demo 视频
https://youtu.be/qql_tM655xw
https://youtu.be/CejsZOpXph0
Upgrade Weblate from git 2.18 version to latest docker
MAKE A BACKUP FIRST.
Ensure the website runs well before upgrading.
If encountering error ImproperlyConfigured: Requested setting DATA_DIR, but settings are not configured. You must either define the environment variable DJANGO_SETTINGS_MODULE or call settings.configure() before accessing settings. when starting server, run export DJANGO_SETTINGS_MODULE=weblate.settings.
Read Generic upgrade instructions from official weblate doc first.
Special instruction for my build: Custom changes to weblate (weblate/trans/formats.py)and translate-toolkit (translate/storage/properties.py)to provide a special “Minecraft Lang File” format. The HTTP server is Gunicorn with Nginx. The operating system is Ubuntu 16.04 and weblate runs on Python 2.7. The database is PostgreSQL 9.5. These softwares will be upgraded or replaced during progress.
Universal step:
Run git fetch --all before git operation to ensure latest code exists.
- Read Version specific instructions and follow it.
- Stop gunicorn/wsgi and celery worker.
git stash(before 3.0.x)git reset --hard(before 3.0.x)git checkout weblate-x.xUsex.x.1or the latest minor version if it exists for a major version.git stash pop(before 3.0.x)pip install -r requirements.txtfind weblate -name '*.pyc' -deleteto remove cached compiled bytecode.- Update
settings.pyto accommodate tosettings_example.py. python manage.py migrate --noinput- follow other manage commands in generic upgrade instructions.
- Start the server and check if everything works well.
Konsole on Windows (WSL)
Konsole的优点(vs XShell/Windows Terminal):
可以随意使用我习惯的 tmux 切 window/pane 快捷键: Shift+←→/Alt+↑↓←→ (XShell 中不可用)
开 tab 连 ssh 时, 能在 tab 上显示 ssh host, 便于区分


EhViewer MOD
我当前主力的看漫画 Android 平板是联想 MIIX 520 上的模拟器. 与正常平板有所不同, 比如长按被 Windows 劫持了.
为了提高 EhViewer 体验, 以及适配我的 Android 设备和我平时的阅读习惯(比如先下载再看, 倒序阅读), 对 EhViewer 进行了部分修改.
由于修改完全依照个人喜好, 暂时无意发起 Pull Request 原 Repo 已 Archive 也发不了 PR 了.
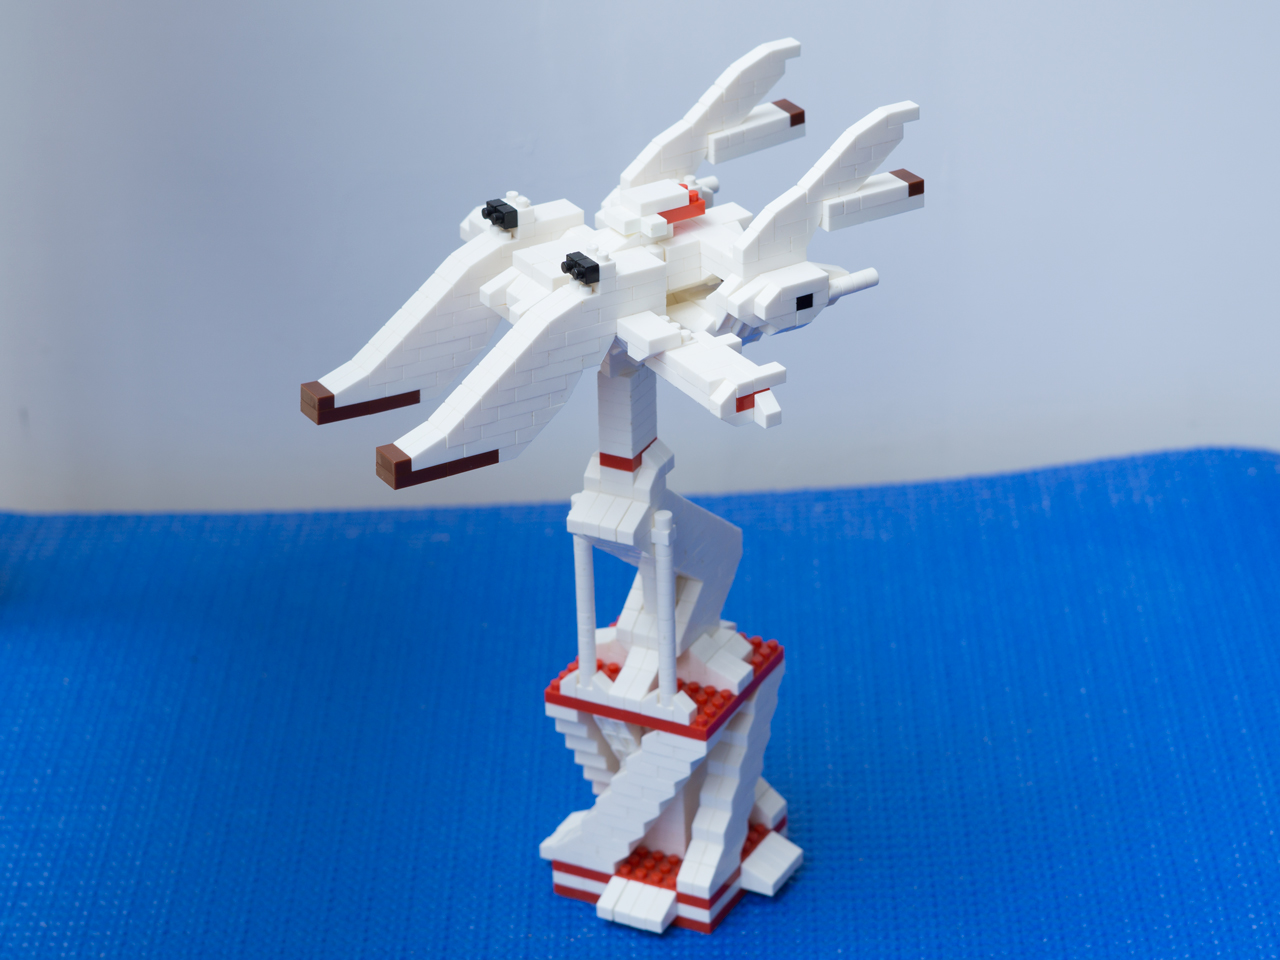
Archangel (Gundam Seed battleship) LOZ edition
拖了一年多的晒图
本体+底座 使用 京东派LOZ积木盒装*3
与BANDAI Freedom 2.0素组大小对比


How many trailing zeros does a factorial have
Simple question: How many trailing zero does 10000! have?
Simple to solve it using python
import math

factorial_answer = str(math.factorial(10000))
print(len(factorial_answer) - len(factorial_answer.rstrip('0')))
Python think about 100ms and tell me the answer is 2499.
This question is name as “Trailing zeros”
https://en.wikipedia.org/wiki/Trailing_zeros
The question become:

So we can just integer divide 10000 by 5 and get 2000, integer divide 2000 by 5 and get 400…. and sum all answers (2000, 400, …) until get 0.
let’s using recursion
def f(r, c=0):
    if r == 0:
        return c
    else:
        return f(r // 5, c + r // 5)


print(f(10000))
The function take two arguments, one for current answer, another for count result.
and make it into one line
f = lambda r, c=0: c if r == 0 else f(r // 5, c + r // 5)
print(f(10000))
Here we assign lambda expression to f and invoke it recursively. However, assign lambda expression is not recommended in PEP8. 不, 这不PEP8. And function f is exposed in namespace. There are ways to make recursive into anonymous lambda function that won’t pollute namespace, as well as make it into really one line.
print((lambda a: lambda r, c = 0: a(a, r, c))(lambda s, r, c: c if r == 0 else s(s, r // 5, c + r // 5))(10000))
Another flaw is, we use same division twice, more precisely, “r // 5” twice.
To eliminate duplicate, closure may help.
def f(r):
    def _f(r):
        while r != 0:
            r //= 5
            yield r

    return sum(_f(r))


print(f(10000))
The process become, constantly dividing number by 5 and yield it to sum, until zero.
Make a function for that “continuously do something and yield it, until some condition” operation
def repeat_w_func(initial_input, repeat_func=None, yield_input=False, end_func=None):
    """
    constantly do calculate function and take output as next time input
    :param initial_input: the initial input
    :param repeat_func: the function that will be evaluate repeatedly
    if not set, the function behavior like itertools.repeat(initial_input)
    :param yield_input: if set to True, initial_input will be yield once before yielding repeat_func output
    :param end_func: the function that will end the loop and stop yielding. if not set, yielding will be endless
    :return: a generator
    """
    result = initial_input
    if yield_input:
        yield result
    if repeat_func:
        while True:
            if end_func:
                if end_func(result):
                    break
            result = repeat_func(result)
            yield result

    else:
        while True:
            yield initial_input
With brand new repeat with function function, we can solve the question elegantly, with help of itertools.takewhile function.
from itertools import takewhile
print(sum(takewhile(lambda x: x != 0, repeat_w_func(10000, lambda x: x // 5))))
Future research
Solve in function programming language like Haskell.
Is there a written functional just work like the repeat_w_func function in python or package?